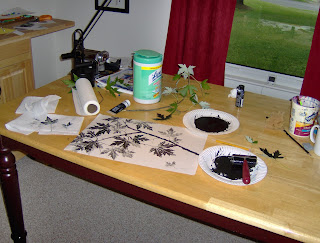


 This morning my art student and I made nature prints as I taught her about observing and recording nature. This is such a fun and easy project with guaranteed results I thought some of you may want to tackle it yourself or with your kids this summer.
First, gather an interesting branch of leaves from a maple or oak tree. Then, set the branch in front of you on the table and paint the shape of the branch only, not the leaves, with thinned-with-water black paint and a smallish brush with a good point. I used an inexpensive black craft acrylic paint. Wiggle the brush as you go to make the branch more natural looking with its lumps and bumps. Also paint in some fine branches coming off the larger ones. These represent the stems of the leaves.
We used rice paper from Taiwan for our project because of its highly absorbent quality, but this project will work just fine on any white or colored paper. You could use: construction paper, printer paper, drawing paper, an old brown paper bag...
Now it is time for the printing. On a paper plate (my favorite kind of palette, no washing involved) squirt out about an inch long worm of printing ink or a large dab of thick black acrylic paint. The ink works better, but the paint will suffice. Most craft stores, like Michael's or A.C. Moore, carry Speedball printing ink in their fine art section. It is not very expensive and worth it for the desired effect. You will also need a brayer. For those who aren't familiar with this tool, it is a rubber roller which can be purchased near the printing ink. Back to the paper plate, use the brayer to roll the ink flat. Roll back and forth from all directions until the ink is shiny and tacky. On a second plate place one of the leaves from your branch, holding onto it by the stem. Roll ink onto the leaf to cover the entire surface. Carefully place the inked leaf, ink side down, on your paper at the end of one of the painted stems. Cover the leaf with a paper towel, unless you want very dirty hands, and rub the whole surface of the leaf lightly. Remove the towel and slowly pull back the leaf to reveal a lovely and accurate print, veins and all. Continue to print this leaf as well as other different sized leaves. Observe your original branch to see how the leaves are placed and how they overlap.
Some final tips for added realism and interest:
- Print a leaf more than once. The second and third printings will be lighter, adding depth to your picture.
- overlap smaller, darker leaves on top of lighter, larger leaves.
- Don't be afraid to let leaves flow off the edges of your paper.
- Choose some leaves that are not whole, perhaps they are slightly bug-eaten. This will also add realism.
- Have wet paper towels or wipes on hand, you will get messy!
Go forth and create. You are guaranteed success! My seven year old student created quite a beautiful masterpiece this morning.


3 comments:
I want to do this. Can I come over and do it at your house? I'll pay you. Seriously.
This is a great project..l jumped over from WTM board. I am going to do this! Thanks for posting
Okay, I'm bookmarkin' ya! This looks like fun! I've tried leaf prints with the kids before, but they never came out so good. I think now I see why.
Post a Comment